webpanel NuttX Web Panel
This guide explains how to run the NuttX Web Panel.
The NuttX Web Panel is a self-hosted web interface for device management. It
provides a browser-based dashboard with system information, an NSH terminal,
file management on SmartFS, and network configuration. The application is
implemented in apps/examples/webpanel/ and is inspired by consumer IoT
management panels.
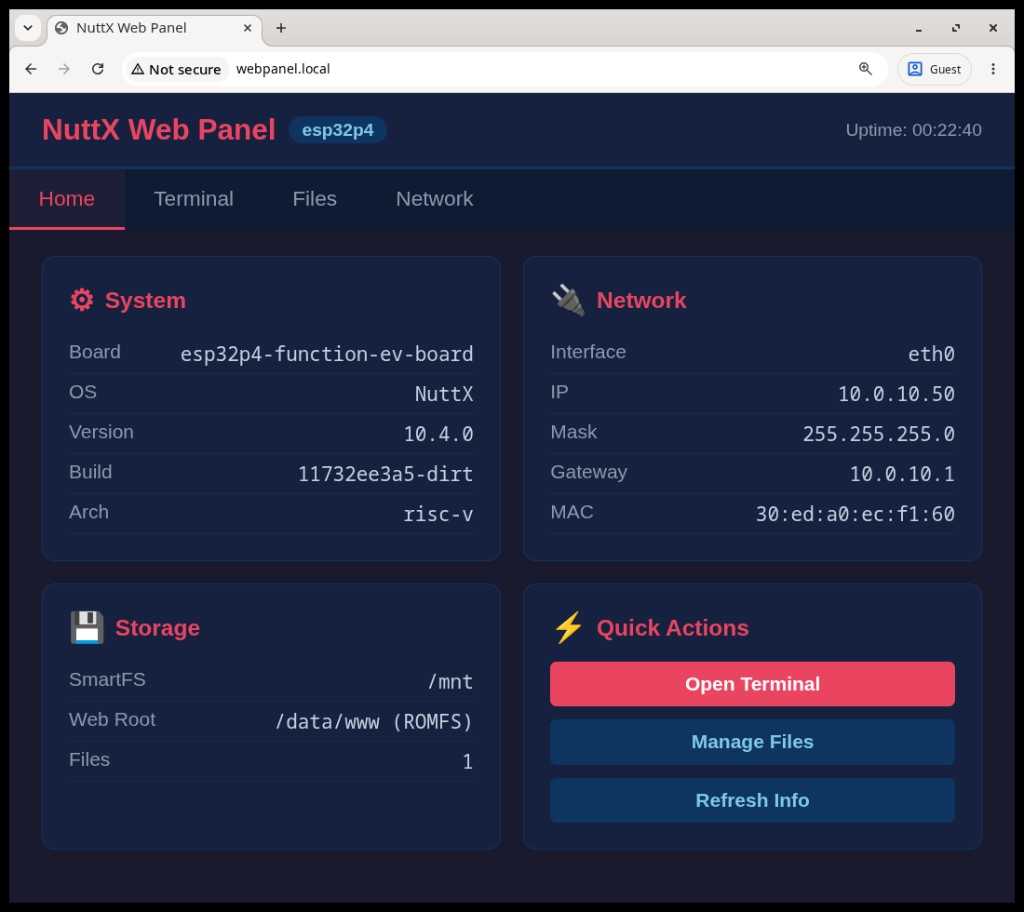
NuttX Web Panel home page on ESP32-P4 (esp32p4-function-ev-board:webpanel)
How Does it Work?
The web panel combines several NuttX components:
THTTPD serves static HTML/CSS/JavaScript from a ROMFS image mounted at
/data/www.BINFS and UNIONFS expose built-in CGI programs under
/data/www/cgi-binfor dynamic requests (system info, file listing, upload, and DHCP renew).libwebsockets provides a WebSocket server (TCP port 8080) that spawns an NSH session over a POSIX pseudo-terminal for the browser terminal.
mDNS advertises the HTTP service as
webpanel.local(_http._tcpon port 80). Themdnsd_eventapplication starts the mDNS daemon when an IP address is assigned.SmartFS on SPI flash (mounted at
/mnt) stores user files, including uploaded Python scripts.
On boot, /etc/init.d/rcS (enabled via CONFIG_ETC_ROMFS) sets the
hostname to webpanel, starts webpanel in the background, and launches
mdnsd_event to register the HTTP service once DHCP completes.
Building and Running the Web Panel
ESP32-P4-Function-EV-Board
For this example, use the ESP32-P4-Function-EV-Board with Ethernet connected
to the board PHY port. The esp32p4-function-ev-board:webpanel defconfig
requires 16 MB flash (see CONFIG_ESPRESSIF_FLASH_16M).
This defconfig includes the CPython interpreter and produces a large firmware image. A full clean build may take several minutes.
Build and flash the board with the following commands:
$ cd nuttx
$ make distclean
$ ./tools/configure.sh esp32p4-function-ev-board:webpanel
$ make -j$(nproc) flash ESPTOOL_PORT=/dev/ttyACM0
On v1.5.2, use /dev/ttyACM0 (USB Serial/JTAG) for flashing. UART0
(GPIO37/GPIO38) remains the serial console; attach an external USB-to-UART
adapter to monitor NSH while the web panel runs.
After flashing, connect the Ethernet cable and wait for DHCP. Then open a browser on the same LAN:
http://webpanel.local
If mDNS is unavailable, check the assigned address on the serial console:
nsh> ifconfig
eth0    Link encap:Ethernet HWaddr 30:ed:a0:ec:f1:60 at RUNNING mtu 1500
        inet addr:10.0.10.50 DRaddr:10.0.10.1 Mask:255.255.255.0
and browse to http://<inet-addr> instead.
The interface provides four sections:
Home — live system and network information
Terminal — browser NSH shell over WebSocket
Files — browse, upload, and run scripts on
/mntNetwork — interface details and DHCP lease renewal
Python scripts can be uploaded through the Files tab and executed from the
Terminal tab or via the Run button for .py files. See also the
Python Interpreter page.
Configuration
The web panel is enabled with CONFIG_EXAMPLES_WEBPANEL. The defconfig also
enables the dependencies selected by that option, including THTTPD,
libwebsockets (server mode), BINFS, UNIONFS, and pseudo-terminal support.
Key Kconfig options (under Application Configuration →
Examples → Web Panel for device management):
CONFIG_EXAMPLES_WEBPANEL_NETIF— network interface name (defaulteth0)CONFIG_EXAMPLES_WEBPANEL_WS_PORT— WebSocket terminal port (default8080)CONFIG_EXAMPLES_MDNS_SERVICE/CONFIG_EXAMPLES_MDNS_SERVICE_PORT— mDNS service type and port advertised bymdnsd_event