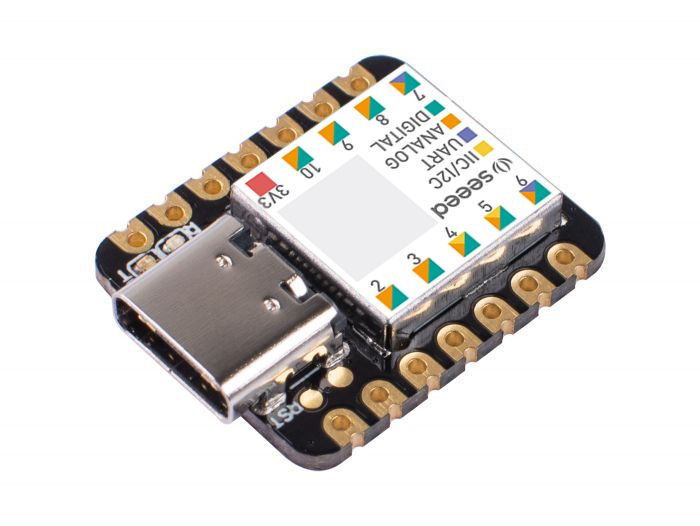
Seeed Studio XIAO SAMD21
The Seeed Studio Xiao SAM21 is the first of the XIAO family, and is a general purpose, low-power and tiny board. It can be referred to as the “Seeed Studio Xiao SAMD21” or the “Xiao Seeeduino”.

Features
ATSAMD21G18A-MU microcontroller chip @48MHz
256KB flash
32KB SRAM
14 pins (11 analog, 11 digital)
10 PWM interfaces
1 DAC output pin
Serial wire debug interface
1 I2C interface
1 SPI interface
1 UART interface
USBC interface
Serial communication indicator LEDs for TX and RX (blue)
Power indicator LED (green)
Blinkable LED (yellow)
Serial Console
By default, the serial console appears on the board’s UART interface. Pin 9 is TX and pin 7 is RX.
Pin Mapping
Pins are numbered anticlockwise from the USB connector.
Pin |
Signal |
Notes |
|---|---|---|
0 |
PA2 |
A0/D0/DAC |
1 |
PA4 |
A1/D1 |
2 |
PA10 |
A2/D2 |
3 |
PA11 |
A3/D3 |
4 |
PA8 |
A4/D4/SDA (I2C) |
5 |
PA9 |
A5/D5/SCL (I2C) |
6 |
PB08 |
A6/D6/TX (UART) |
7 |
PB09 |
A7/D7/RX (UART) |
8 |
PA7 |
A8/D8/SCK (SPI) |
9 |
PA5 |
A9/D9/MISO (SPI) |
10 |
PA6 |
A10/D10/MOSI (SPI) |
11 |
3V3 |
|
12 |
GND |
|
13 |
5V |
You can supply 5V power on this pin too. |
There are also four pads on the back side of the board. SWCLK, SWDIO for serial wire debugging, and RST and GND for resetting the board. These same two pins are also exposed on the top of the board.
Power Supply
The board can be powered through a USB-C connection. It can also be supplied 5V power through it’s 5V power pin.
There is an additional two pads for powering the board (VIN and GND) on the back side. The board accepts anywhere between 3.3V and 5V.
Installation
To build NuttX for the Xiao Seeduino, you can use the following configuration
commands within the cloned nuttx repository:
$ ./tools/configure.sh xiao-seeeduino:nsh
$ make
This will generate a nuttx.hex file. To put the program on your board, you
can choose from one of the following:
Convert the hex file to a uf2 file using the Microsoft uf2 tool:
$ git clone https://github.com/microsoft/uf2.git
$ cd uf2/utils
$ python uf2conv.py -f 0x68ed2b88 -b 0x2000 nuttx.hex -o nuttx.uf2
Then, plug your board into the host computer using the USB-C interface. Short the RST (reset) pad with ground twice in a row quickly. The board will be detected as mass storage under the name “Arduino”, and its orange LED will be pulsing slowly. You can then copy the UF2 file to the drive/storage device which appears. Once the file is done copying, the board will auto-eject and you will have an NSH console on the UART pins!
Todo
Maybe this process should be part of the post-build scripts, since the Microsoft UF2 tools is MIT licensed.
Flash the hex file using the
bossactool. You can find the source for it here, or you can install it on Arch Linux via the AUR with this command:$ yay -S bossa
Then, plug your Seeduino in via USB-C to the host computer and short the RST (reset) and ground pins twice in a row quickly. The board will be detected as mass storage under the name “Arduino”, and its orange LED should be pulsing. You can then run the following command:
$ sudo stty -F <path/to/xiao-USB-port> 1200
$ sudo bossac -i -d --port=<path/to/xiao-USB-port> -i -w -v nuttx.hex -R
Todo
The
bossacutility doesn’t actually work for programming in my testing yet. It is what the Arduino IDE uses but I haven’t managed to get the command line working. Using the commands listed above does actually detect the board but the programming itself fails with “Flash command failed”. This needs more debugging.
Configurations
nsh
Basic NuttShell configuration with the console enabled on the UART interface at 115200 bps. Comes with “Hello world” demo.